


Looking for a Halloween rock painting idea that’s more fun than frightening? This easy mummy rock painting is about as simple as it gets, and those crooked mummy bandages mean you don’t have to worry about painting perfect lines!
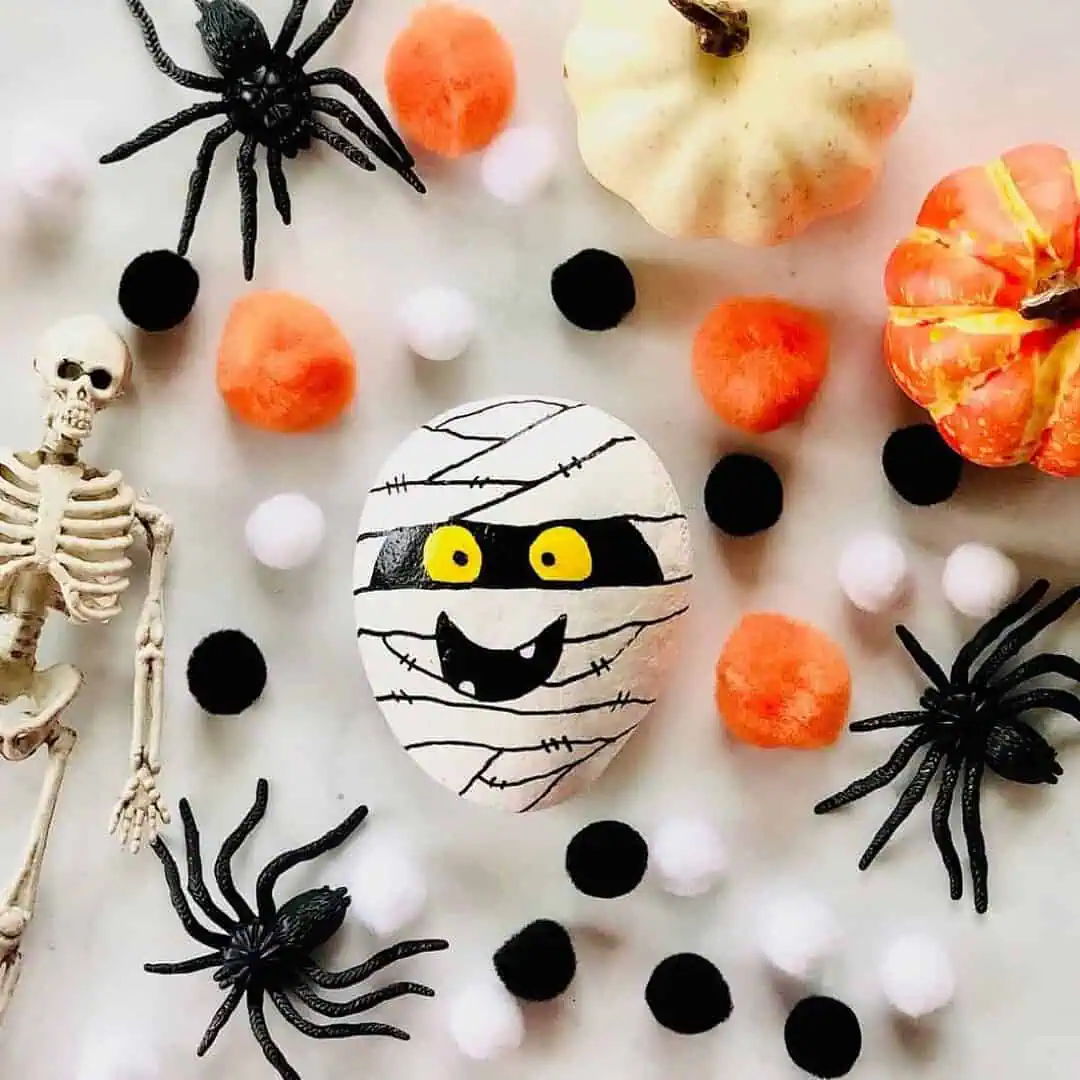
With a little white acrylic paint and a couple of paint pens, you can turn an ordinary rock into a silly, spooky mummy complete with glowing yellow eyes peeking through its wraps.
This mummy painted rock is a fun Halloween craft for beginners, older kids, families, or anyone who wants an easy design to add to their Halloween rock collection. Once you make one, try painting a whole little mummy family with different eyes and expressions.
Let’s get those mummies wrapped!
Table of Contents
Mummy Rock Painting Supplies
You only need a few basic supplies for this easy Halloween painted rock.
- Smooth rock
- White acrylic craft paint
- Paintbrush
- Paint pens
- Pencil, optional
- Paint palette or paper plate
- Clear rock sealer
Colors I used: white, black, and yellow.
If you’re brand-new to painted rocks and aren’t sure which paints, pens, or sealers to use, start with my How to Paint Rocks Beginner’s Guide. It covers the basics so you can spend more time painting and less time wondering which supplies you actually need.
Before You Start Your Mummy Rock Painting
The nice thing about mummy rocks is that you don’t need to hunt for one perfect rock shape.
A smooth oval, round, or slightly rectangular rock will work. In fact, a few bumps or an unusual shape can give your mummy even more personality.
Before painting, wash the rock with a little soap and water to remove dirt and dust. Let it dry completely.
A fairly smooth surface will make it much easier to draw the mummy’s black bandage lines with a paint pen later.
Now you’re ready to paint!
How to Paint a Mummy Rock
This mummy rock painting tutorial uses a white painted background with black mummy bandages and bright yellow eyes.
Don’t worry about making every line identical. Real mummy bandages certainly wouldn’t be perfectly straight, and your painted ones shouldn’t be either!
Step 1: Paint the Rock White
Paint the top and sides of your rock with white acrylic craft paint.
Let the first coat dry before deciding whether it needs another coat. Depending on the original color of your rock, you may need two thin coats to get an even white background.
Quick Tip: A couple of thin coats usually look smoother than one thick coat of paint.

Step 2: Create the Opening for the Mummy’s Eyes
Once the white paint is completely dry, use a black paint pen to draw two lines across the upper-middle portion of the rock.
This will create the opening where your mummy’s eyes will eventually peek through the bandages.
Leave enough space between the two lines to add two eyes later.
Don’t add the eyes just yet. We’re still wrapping this mummy!

Step 3: Draw the Mummy Bandages
Now comes the fun part.
Use your black paint pen to draw lines at different angles across the rock to create the look of overlapping mummy bandages.
Some lines can travel diagonally across the rock while others can angle in the opposite direction. Continue adding lines around the eye opening and down toward the bottom of the rock.
There is really no wrong way to do this.
A few uneven and crooked lines actually make this Halloween mummy rock look better because the bandages appear old and randomly wrapped.
Quick Tip: Leave some white space between the black lines. You want the white sections to look like strips of mummy wrapping instead of covering the entire rock with black.

Step 4: Add the Dark Eye Area
Next, define the opening around your mummy’s eyes.
Draw two eye shapes inside the opening you created earlier. Then use the black paint pen to fill in the surrounding area so the eyes look like they are peeking out from underneath the mummy’s wrappings.
That dark background is what will make the yellow eyes really stand out.
Let the black paint dry before adding the yellow.

Step 5: Paint the Mummy’s Yellow Eyes
Time to give your mummy a little personality.
Fill each eye with a yellow paint pen. Once the yellow has dried, use your black paint pen to add a small pupil inside each eye.
Your mummy can look spooky, silly, surprised, or downright grumpy depending on how you position the pupils.
That’s half the fun!
Quick Tip: Change the direction of the pupils if you’re painting several mummy rocks. Looking up, down, sideways, and cross-eyed can give each mummy a completely different expression.

Step 6: Give Your Mummy a Mouth
Using your black paint pen, draw a small mouth near the bottom of the mummy rock.
You can copy the dark mouth from my original mummy or change the expression to make your own design.
Try:
- A tiny spooky mouth
- A crooked grin
- A surprised “O” shape
- A silly smile
- A toothy monster mouth
This is a simple little detail, but it can completely change your mummy’s personality.

Step 7: Let the Mummy Rock Dry and Seal It
Let your finished mummy painted rock dry completely before handling or sealing it.
If you plan to display the rock outdoors or want to protect the painted design from scratches and handling, finish it with your preferred clear rock sealer.
Always follow the directions on the sealer you’re using, especially when it comes to drying time and ventilation.
And that’s it! One ordinary rock has officially been mummified.
Save this mummy rock painting idea for Halloween! Pin the tutorial now so you’ll have an easy Halloween craft ready when you’re in the mood for a little spooky-season painting.
Mummy Rock Painting Tips
This is a very forgiving rock painting project, which is one reason it’s such a good choice for beginners and kids.
Keep these simple tips in mind as you paint:
- Let the white paint dry completely. Make sure the white acrylic base coat is fully dry before drawing over it with paint pens. If the paint is still tacky, the pen can drag or pull up the paint underneath.
- Don’t make the bandages too perfect. Crooked and uneven lines actually make the mummy look better. Change the direction and spacing of the lines as you work across the rock to create the look of overlapping wraps.
- Use a fine or medium-tip paint pen. A medium-tip pen works well for the main mummy bandages, while a finer tip is helpful for the pupils, mouth, and smaller details.
- Leave plenty of white space between the lines. Avoid placing the black lines too close together. The white areas are what create the look of mummy bandages.
- Make the eye area nice and dark. A solid black background around the yellow eyes creates contrast and helps those spooky eyes really stand out.
- Wait for each color to dry before adding details. Let the black eye area dry before adding yellow, and let the yellow dry before drawing the pupils. This helps prevent the colors from smearing together.
- Change the eyes to give each mummy personality. Point the pupils in different directions, make them larger or smaller, or angle the eyes slightly to create silly, surprised, or spooky expressions.
- Paint several mummy rocks at the same time. Paint all of your rocks white first, then add the bandages and faces assembly-line style. It’s an easy way to create a whole collection of Halloween mummy rocks without much extra work.
- Seal the rock only after everything is completely dry. If you’re using a clear sealer, give the paint and paint pens plenty of time to cure first so the finished design doesn’t smear.
Extra idea: Paint mummy rocks in several different sizes and give each one a different expression. Group them together for an easy little mummy family Halloween display.
Easy Mummy Rock Painting Ideas and Variations
You don’t have to make your mummy exactly like mine.
Once you know the basic technique, there are plenty of ways to change the design and create a whole collection of Halloween mummy rocks.
- Cute Mummy Painted Rock: Give your mummy big round eyes, wide pupils, and a little smile instead of a spooky expression. This is a fun version for younger kids or anyone who prefers cute Halloween crafts over creepy ones.
- Spooky Mummy Rock: Make the eyes smaller and angle them slightly downward. You could also make the eye opening wider and give your mummy a darker or crooked mouth for an extra spooky look.
- Googly-Eye Mummy Rocks: Skip the painted eyes and glue on a pair of googly eyes instead. Oversized googly eyes can make mummy rocks look especially silly, which is always a hit with kids.
- Glow-in-the-Dark Mummy: Use glow-in-the-dark paint for the eyes or add a few glowing accents to the mummy wrapping. Display the rock somewhere it can soak up some light during the day, then see how it looks when the lights go out.
- Colorful Mummy Rocks: Who says mummy bandages always have to be plain white? Keep the traditional white mummy but add purple, orange, green, or even bright pink details. You can also change the eye colors so every mummy in your collection looks different.
- Make a Mummy Rock Family: Grab rocks in several different sizes and turn them into a whole mummy family. Give each mummy different eyes and expressions. One can look grumpy, another surprised, and another completely confused about how it ended up wrapped in bandages.
This is an easy way to turn one mummy rock painting idea into a complete Halloween display.
Fun Ways to Use Your Halloween Mummy Rocks
Painted rocks don’t have to disappear into a drawer when you’re finished.
Use your mummy rocks as part of your Halloween decorating around the house. Add them to a tiered tray, set them beside a pumpkin, tuck them onto a bookshelf, or group several Halloween painted rocks together on a table.
They can also make a fun family Halloween craft night. Put out several rocks, paints, and pens and let everyone create their own mummy.
For kids, you could even paint several Halloween characters and use them as story stones. A mummy, ghost, monster, black cat, and jack-o’-lantern can inspire some pretty entertaining spooky stories.
Mummy Rock Painting FAQ
What kind of paint should I use for mummy painted rocks?
Acrylic craft paint works well for the white base because it provides good coverage and dries fairly quickly. Paint pens are especially useful for creating the black bandage lines and smaller facial details.
Do I need paint pens to make a mummy rock?
No. You can paint the entire mummy with acrylic paint and small paintbrushes if that’s what you already have.
Paint pens simply make drawing the narrow black lines, eyes, pupils, and mouth a little easier.
What shape of rock works best for a mummy?
Smooth oval, round, and slightly rectangular rocks all work well for mummy rock painting.
Instead of searching for one exact shape, choose a rock with enough smooth surface area for the mummy’s face and bandage lines.
Can kids make mummy painted rocks?
Absolutely. Mummy rocks are one of my favorite easy Halloween rock painting ideas for kids because the bandage lines don’t need to be perfectly straight.
Younger painters can make simple versions while older kids can add more details and different expressions.
For more projects they can try, check out my Halloween Rock Painting Ideas for Kids.
Do I have to seal my mummy painted rocks?
You don’t necessarily have to seal a rock that will simply sit indoors as a Halloween decoration.
If the rock will be handled frequently or displayed outdoors, adding a clear sealer can help protect the painted surface.
What other colors can I use for the mummy’s eyes?
Yellow gives this mummy rock its classic spooky look, but green, orange, purple, red, or glow-in-the-dark paint would all be fun alternatives.
Try painting several mummies with different colored eyes.
More Halloween Rock Painting Ideas
Don’t put away those paint pens yet!
If you had fun making this mummy, there are plenty more Halloween painted rocks waiting to join your spooky little collection.
Start with my 31+ Halloween Rock Painting Ideas, where you’ll find everything from silly monsters and candy corn to ghosts, skeletons, paint pours, and other easy Halloween designs.
For something completely different, try my Halloween Ghost and Bat Dot Art Rocks. They combine simple Halloween shapes with colorful dot painting and are another fun project for beginners.
You can also turn out the lights with my Glow-in-the-Dark Skeleton Painted Rock or get the kids involved with these easy Halloween rock painting ideas for kids.
Whether your Halloween style is cute, spooky, silly, or somewhere in between, painted rocks are an easy way to enjoy a little creative time without needing a long list of supplies.
So grab another rock and keep painting. Your mummy could probably use a few spooky friends!
Happy Haunting!
