


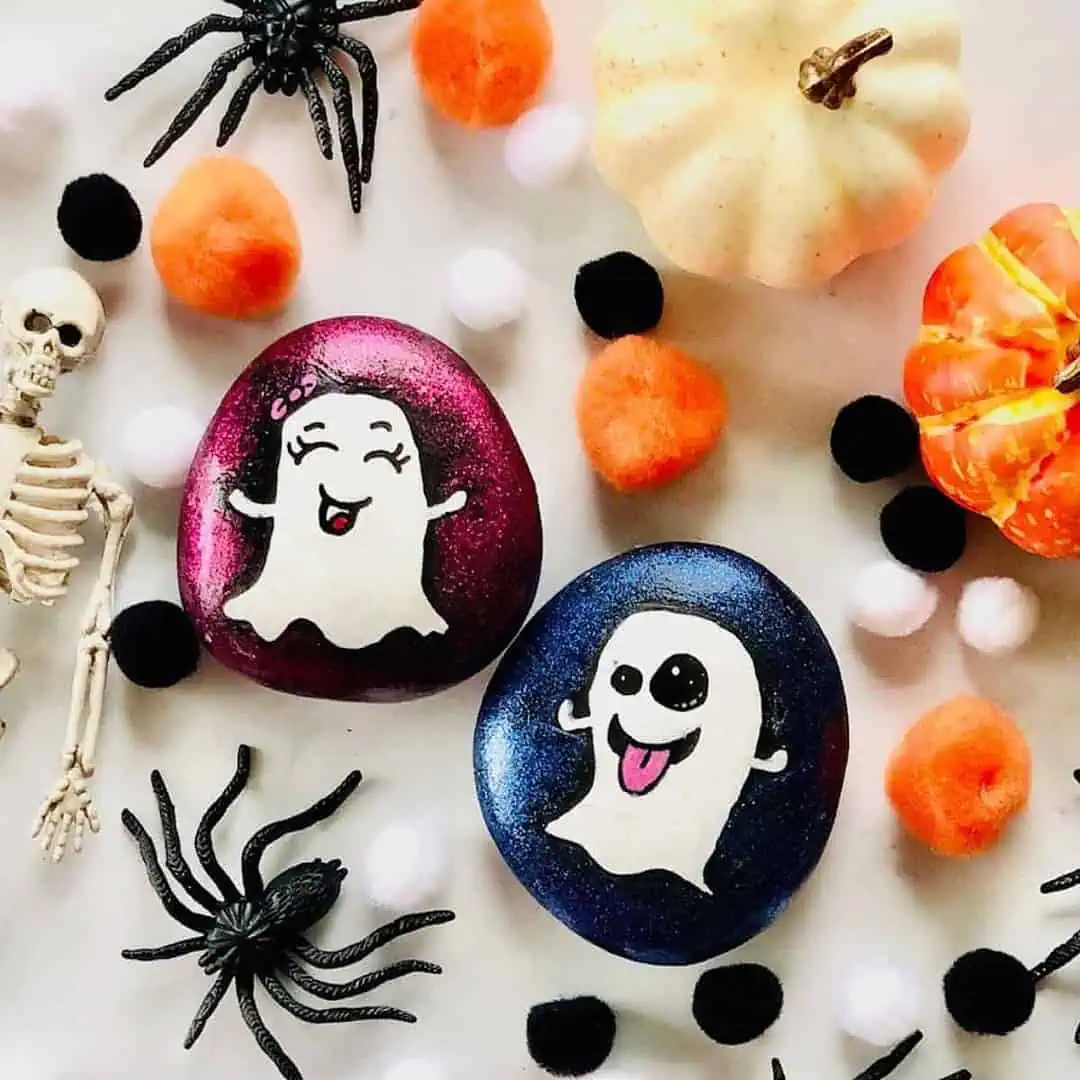
Looking for a Halloween rock painting idea that’s more silly than spooky? These ghost painted rocks are full of personality, with funny emoji-inspired faces, bright colors, and a little glitter for extra Halloween fun.
This is an easy rock painting project for adults, families, and older kids. The ghost is made from simple shapes, so you don’t need advanced drawing skills to create one. Once you have the basic ghost painted, you can change the eyes, mouth, tongue, bow, and expressions to make an entire collection of goofy little ghosts.
If you’re planning a Halloween painting day, be sure to check out my Halloween Rocks for Kids and Halloween Ghost and Bat Dot Art Rocks for even more ideas.
Jump to:
Supplies for Ghost Painted Rocks
You don’t need many supplies to make these cute Halloween ghost rocks.
- Smooth, flat rocks
- White acrylic craft paint
- Paint pens
- Glitter paint
- paintbrushes
- Pencil
You can easily change the colors to use whatever Halloween paints you already have in your craft supplies.
Before You Start
Start with a smooth, fairly flat rock that gives you plenty of room for the ghost’s face.
Oval and rounded rocks work especially well, but don’t worry about finding the perfect shape. Part of the fun of rock painting is working with the natural shape of the stone.
Wash your rocks with soap and water to remove dirt and dust, rinse them well, and allow them to dry completely before painting.
If you’re brand new to painting rocks, starting with a clean, smooth surface makes it much easier to get neat lines and good paint coverage.
How to Paint Ghost Rocks Step by Step
These ghost painted rocks are easier to make than they might look. The trick is working in layers and allowing the paint to dry before adding the next detail.
Step 1: Paint the Rock White
Paint the front of the rock with white acrylic craft paint.
Depending on the paint you’re using, you may need two coats to get a nice solid white background.
Allow the first coat to dry before adding a second coat.
Let the rock dry completely before moving on to the ghost design.

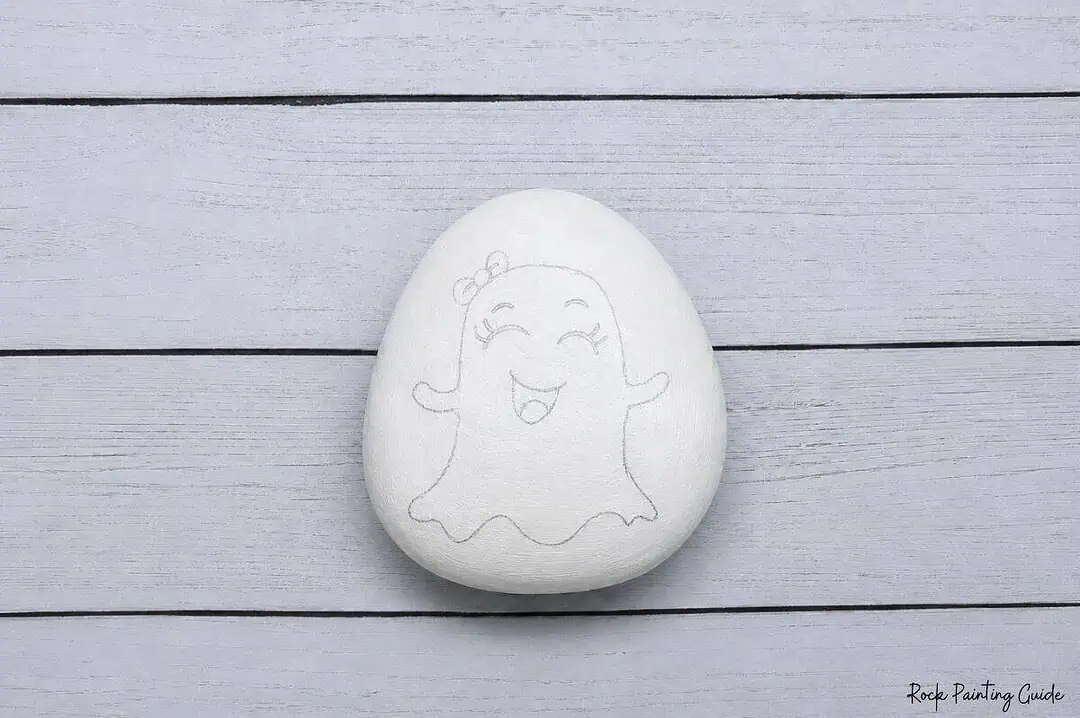
Step 2: Sketch the Ghost
Use a pencil to lightly sketch the basic ghost shape onto the white rock.
Draw the rounded top of the ghost first, then add the arms and the wavy shape along the bottom.
Next, lightly sketch the eyes and mouth.
Don’t worry about making the drawing perfect. The black paint pen will cover most of the pencil lines later.
For a ghost emoji look, make the eyes and mouth larger than you normally would. Those exaggerated facial features are what give these ghosts their silly personality.
Step 3: Outline the Ghost
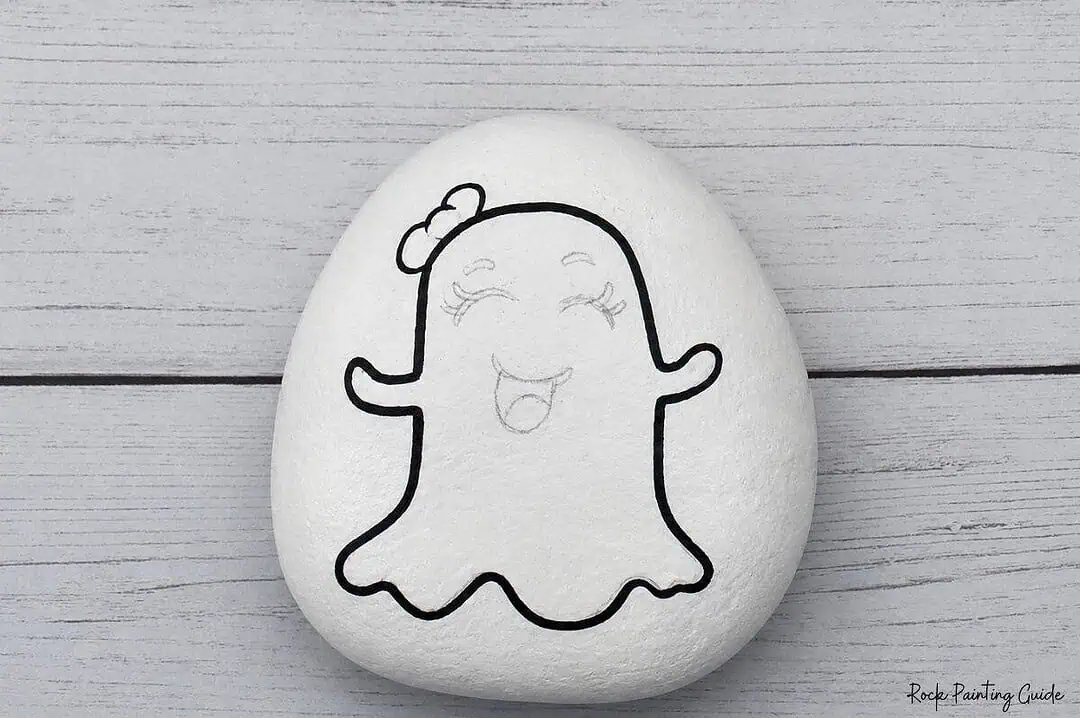
Use a black paint pen to trace over your pencil drawing.
Outline the outside of the ghost first, including the arms and wavy bottom.
Then trace around the eyes and mouth.
Work slowly around the curved areas so your lines stay fairly smooth.
Allow the black outline to dry before filling in the facial features. This helps prevent accidentally smearing the paint pen with your hand.
Step 4: Paint the Ghost Face
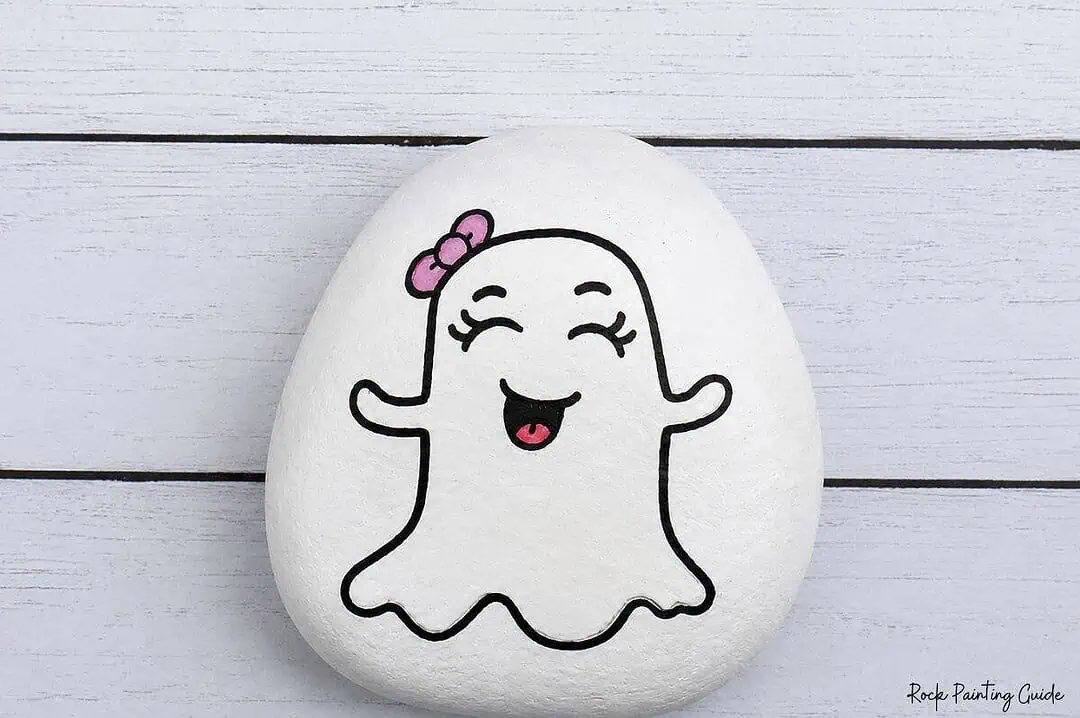
Fill in the eyes and mouth with black.
Leave small white areas inside the eyes to create highlights. Those tiny white highlights make a big difference and give the ghost a more animated emoji-style expression.
Add a pink or red tongue inside the mouth.
If you’re making the girl ghost, add a small pink bow near the top of the ghost.
You can follow the original design or give each ghost a completely different expression.
Save this ghost painted rocks tutorial for later! Pin it to your favorite Halloween craft board so you’ll have it ready when you’re looking for an easy Halloween painting project.
Step 5: Add Purple Glitter Paint
Once the ghost and facial details are completely dry, add purple glitter paint to finish the design.
Paint carefully around the ghost so the white shape and black outline remain easy to see.
Depending on your glitter paint, you may want to add a second coat after the first coat dries to create a little more sparkle.
Allow the finished rock to dry completely.
That’s it! Your silly ghost emoji rock is ready for Halloween.
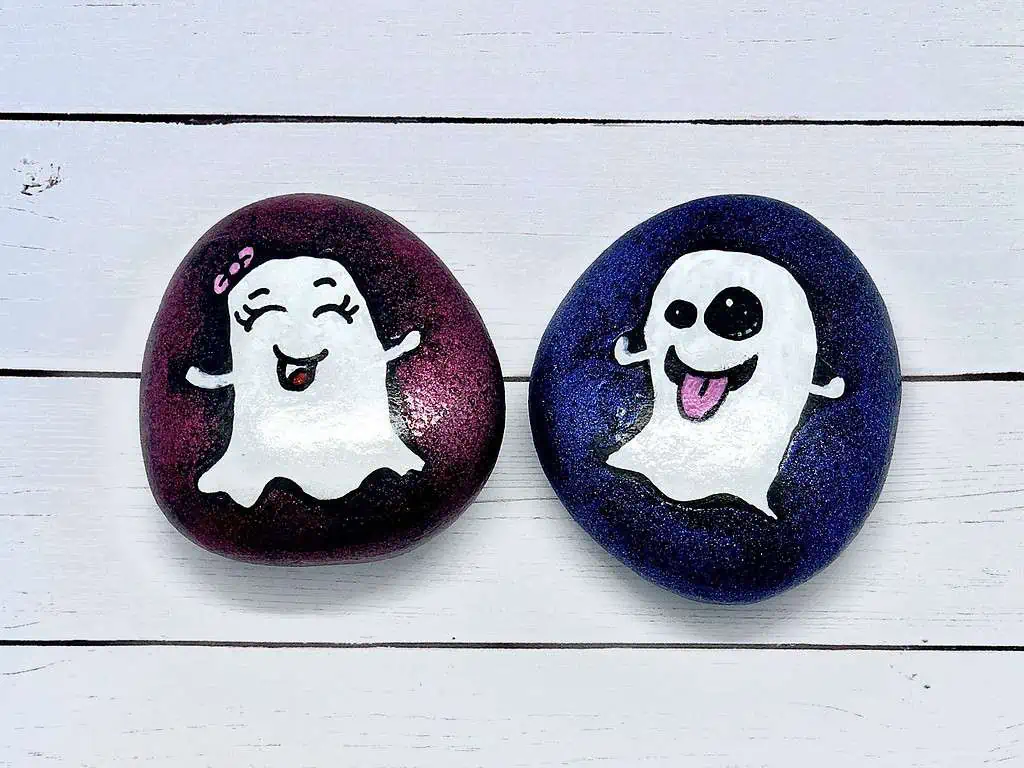
Cute Ghost Face Ideas
Once you know how to paint the basic ghost shape, you can make an entire collection of painted ghost rocks without making any two exactly alike.
Try changing the facial expressions on each rock.
- Silly Ghost: Add big eyes and a tongue sticking out.
- Surprised Ghost: Paint round eyes with a large O-shaped mouth.
- Happy Ghost: Add a big smile and rosy pink cheeks.
- Winking Ghost: Paint one open eye and one simple curved wink.
- Girl Ghost: Add eyelashes and a bright pink bow.
- Goofy Ghost: Make one eye larger than the other and add a crooked smile.
- Spooky Ghost: Use long dark eyes and a wide open mouth for a more traditional Halloween look.
Extra Idea: Make a Ghost Emoji Family
Instead of painting just one ghost, make several rocks and give every ghost a different expression.
You could create happy, surprised, sleepy, silly, grumpy, and excited ghosts.
Set them together in a bowl or basket for an easy handmade Halloween decoration.
This is also a fun way to let everyone in the family paint their own ghost while still keeping the rocks coordinated as a set.
Tips for Painting Ghost Rocks
A few simple tricks can make your ghost rock painting project much easier.
- Choose smooth rocks. A smooth surface makes it easier to draw the ghost and add small facial details.
- Use thin coats of paint. Several thin coats usually look smoother than one heavy coat.
- Let each layer dry. Adding paint over a wet layer can cause colors to smear or blend together.
- Sketch lightly. Heavy pencil marks can be difficult to cover with white paint.
- Test your paint pen first. Scribble on scrap paper before touching the rock to make sure the paint is flowing properly.
- Keep the outline bold. The black outline helps the white ghost stand out from the glitter background.
- Don’t worry about perfect faces. Slightly crooked eyes or goofy smiles often make these ghost rocks even cuter.
- Let the glitter dry completely. Glitter paint can take longer to dry than regular acrylic craft paint.
Fun Ways to Use Ghost Painted Rocks
These little ghosts aren’t just fun to paint. They make cute handmade Halloween decorations, too.
Try using your finished rocks as:
- Halloween shelf decorations
- Decorations for a Halloween party table
- Classroom Halloween crafts
- Painted rock hunt treasures
- Halloween party favors
- Small handmade gifts
- Decorations for a bowl or basket filled with painted Halloween rocks
You could also paint several Halloween characters and display them together.
A ghost, mummy, pumpkin, Frankenstein, candy corn, and bat would make an adorable Halloween rock collection.
More Halloween Rock Painting Ideas
If one Halloween rock isn’t enough, I have plenty more spooky and silly designs to try.
Paint an easy Halloween Mummy Rock, try these Candy Corn Painted Rocks, or make a Ghost and Bat Dot Art Rock.
You can also browse my 19 Ghost Painting Ideas for even more ways to add ghosts to your Halloween craft projects.
If you enjoy easy rock painting projects like these, sign up for my email list so you don’t miss new seasonal crafts and painting ideas.
Ghost Painted Rocks FAQ
What paint is best for ghost painted rocks?
Acrylic craft paint works very well on rocks because it is easy to use, dries fairly quickly, and comes in lots of colors.
Do I need to paint the rock white first?
For this ghost emoji design, painting the rock white first gives you a clean surface for drawing and painting the ghost.
Can kids make these ghost painted rocks?
Yes. Older kids can usually complete the project on their own. Younger children may need help drawing the ghost shape or adding the smaller facial details.
Can I use paint pens instead of acrylic paint?
Yes. Paint pens are especially helpful for the black outline, eyes, mouth, and other small details. Acrylic craft paint is usually faster for covering larger areas.
Do all of the ghosts have to look the same?
Not at all. Changing the eyes, mouth, tongue, bow, or expression is one of the most fun parts of this project.
What other colors can I use?
Use any Halloween colors you like. Purple, orange, green, pink, blue, and black all work well with the white ghost design.
Make a Few Ghosts for Halloween
These ghost painted rocks are a fun way to add a little humor to your Halloween crafting. They’re simple enough for a relaxed family craft afternoon, but there are plenty of ways to add details and personality if you want to get creative.
Once you’ve painted the first ghost, don’t be surprised if you want to make a whole group of them. Give every rock a different emoji expression, add plenty of glitter paint, and you’ll have a cute collection of Halloween ghosts ready to display all season long.
