


Monster rocks are one of those Halloween crafts where the sillier they look, the better! These colorful fuzzy monsters are easy to paint, beginner-friendly, and nearly impossible to mess up because every monster can have its own goofy personality.
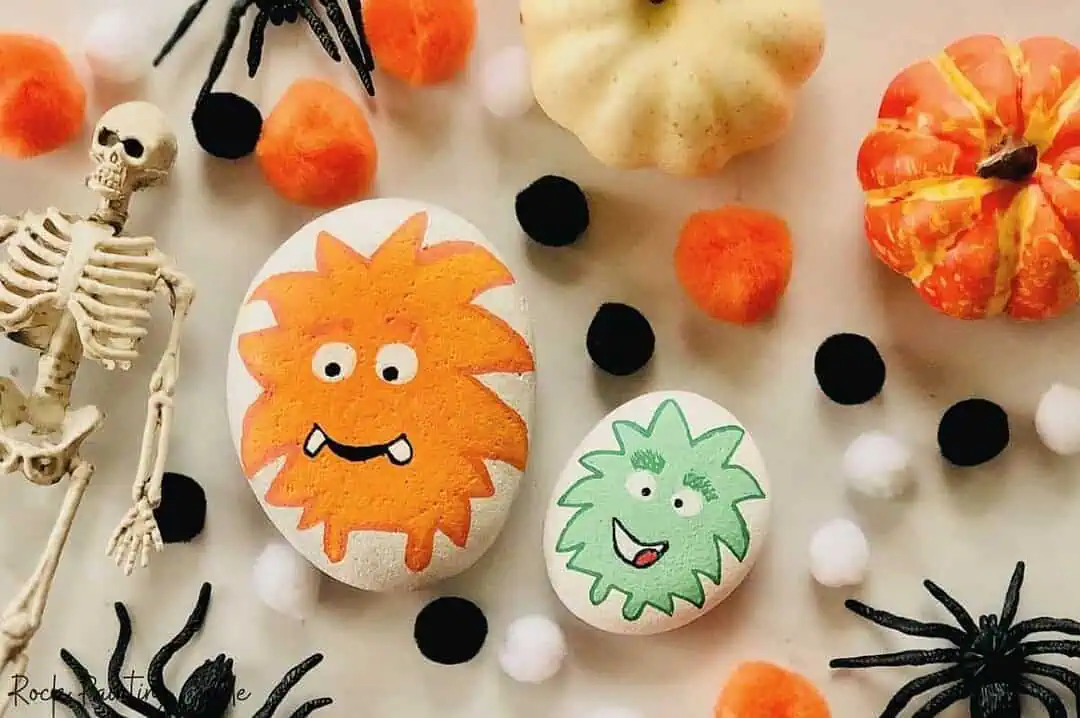
This monster rock painting tutorial shows you how to turn ordinary rocks into bright orange and green fuzzy monsters using acrylic paint and paint pens. Add one eye, three eyes, crooked teeth, or a silly grin. There really are no rules when you’re painting monsters.

These monster painted rocks are a fun Halloween craft for adults, families, and older kids. Make just one or create an entire little monster family with different colors and expressions.
Table of Contents
Why You’ll Love These Monster Painted Rocks
You don’t need perfect painting skills to make cute monster rocks. In fact, uneven lines, crooked teeth, and funny-looking eyes make them even more fun.
This project is great because:
- It’s beginner-friendly.
- You don’t need to know how to draw complicated designs.
- Every monster can look completely different.
- It’s easy to change the colors and faces.
- It’s a fun Halloween rock painting project for families.
- You only need a few basic rock painting supplies.
The fuzzy border is my favorite part because it gives these little monsters a lot of personality without requiring any difficult painting techniques.
Supplies for Monster Rock Painting
You only need a handful of supplies to make these fuzzy painted rock monsters.
How to Paint Monster Rocks
These fuzzy monsters are simple enough for beginners, but there are a few easy tricks that make the bright colors and fuzzy edges stand out.
Step 1: Paint the Rock White
Start by painting the front of your clean rock with white acrylic paint.
The white base coat gives the bright monster colors a clean surface and helps colors such as orange and green look more vibrant.
Depending on your paint, you may need a second coat.
Let the white paint dry completely before moving on.
Step 2: Paint the Monster’s Base Color
Paint the main area of your monster with a bright color.
For these monsters, I used orange and green, but this is a great place to experiment.
You don’t need to paint all the way to the outside edge of the rock. Leaving a little space around the design gives you room to add the darker fuzzy outline in the next step.
Add another coat if needed for good coverage.
Let the paint dry.

Step 3: Add the Fuzzy Monster Outline
Now it’s time to give your painted rock monster that fuzzy look.
Use a darker shade of the monster’s base color and work around the outside edge of the painted area.
Instead of creating one perfectly smooth outline, make lots of short, uneven strokes pointing outward.
Don’t worry about making every little line match.
A slightly messy edge makes the monster look fuzzy and gives it more character.
For the orange monster, use a deeper orange around the outside.
For the green monster, use a darker green.

Step 4: Add the Eyes
Once the fuzzy outline is finished, start adding your monster’s face.
Paint one large eye, two eyes, or several smaller eyes.
You can make the eyes different sizes or place them slightly off-center for an extra silly expression.
Start with white for the eyeballs, let the paint dry, and then add black pupils with a paint pen.
This is where your monster really starts developing its personality.

Step 5: Paint the Monster’s Mouth and Teeth
Use a black paint pen to draw the mouth.
Then add white teeth.
The teeth definitely don’t have to be straight. Try:
- Two large front teeth
- Tiny pointed teeth
- One crooked tooth
- A mouth full of different-sized teeth
- A tongue sticking out
You can also add eyebrows, eyelashes, spots, or other little details.
There is no such thing as a wrong monster face.

Step 6: Let the Monster Rock Dry
Once all the details are finished, set the rock aside until the paint is completely dry.
It’s tempting to start sealing right away, but giving all those small paint pen details time to dry helps prevent smearing.
Easy Monster Face Ideas
One of the best things about monster rock painting is that you can use the same basic technique and create dozens of completely different rocks. Try changing just a few facial features to give each monster its own personality.
- One-Eyed Monster: Paint one oversized eye right in the center of the monster and add a big grin underneath for a simple cyclops-style look.
- Three-Eyed Monster: Add three eyes in different sizes across the top of the face. They don’t even have to line up.
- Goofy Tooth Monster: Paint a wide mouth with one or two oversized teeth. A single crooked tooth can make a simple monster rock look especially funny.
- Grumpy Monster: Add slanted eyebrows over the eyes and a little frown for a cranky expression.
- Happy Monster: Give your monster big eyes, raised eyebrows, and a wide toothy smile.
- Spotted Monster: Add small dots or spots over the monster’s body before painting the face.
- Horned Monster: Add two tiny horns along the top of the design for an extra playful monster look.

Extra idea: Make a monster family with a large parent monster and several smaller baby monster rocks.
Save or pin this monster rock painting tutorial so you’ll have the ideas handy when you’re ready for a Halloween craft day.
Monster Rock Painting Tips
A few little tricks can make this project even easier.
- Use a white base coat. Bright orange, green, yellow, and other colors usually look better when painted over white instead of directly onto a dark rock.
- Let each layer dry. Paint pens can drag through wet acrylic paint and create smudges.
- Don’t make the fuzzy edge perfect. Short strokes in slightly different lengths will look more like fur.
- Sketch the face first if needed. If you’re nervous about placing the eyes and mouth, lightly sketch them with a pencil before using a paint pen.
- Start with the largest facial features. Paint the eyes and mouth first, then add smaller details around them.
- Mix up your monster colors. Orange and green are perfect for Halloween, but purple, blue, pink, and yellow monsters are just as cute.
- Use different rock shapes. A tall rock can become a long monster, while a wide round rock is perfect for a giant goofy face.
This is also a great craft for using up little amounts of leftover acrylic paint from other rock painting projects.
More Halloween Rock Painting Ideas
Once you start painting Halloween rocks, it’s hard to stop at just one design.
If you’re looking for more spooky and silly projects, check out my 31+ Halloween Rock Painting Ideas for even more inspiration.
For another easy project, try these Halloween Rocks for Kids with simple designs that are fun for family craft time.
You might also like my Mummy Rock Painting Tutorial or these colorful Candy Corn Painted Rocks.
And if you enjoy dot painting, don’t miss the Halloween ghost and bat dot art rocks for another fun way to decorate stones for the season.
Monster Rock Painting FAQ
What paint is best for monster rocks?
Acrylic craft paint works very well for painted rocks because it dries quickly and comes in lots of bright colors. Acrylic paint pens are also helpful for eyes, mouths, teeth, and other small details.
Do I need to prime rocks before painting?
You don’t have to use a traditional primer, but I recommend painting the rock white before adding bright colors. The white base helps colors such as orange and green stand out.
Can kids make monster painted rocks?
Yes. Monster rocks are a fun project for older kids because the designs don’t need to be perfect. Younger children can also participate with age-appropriate supplies and adult supervision.
Do painted rocks need to be sealed?
If you plan to put your painted rocks outdoors, a protective clear sealer is a good idea. Indoor rocks don’t always need sealer, although it can help protect the paint.
What can I use to create the fuzzy monster outline?
You can use a small paintbrush or an acrylic paint pen in a darker shade of your monster’s main color. Add lots of short strokes around the outside instead of drawing one solid smooth line.
What colors work best for Halloween monster rocks?
Orange, green, purple, and black are classic Halloween choices, but monsters can be any color you want. Bright colors usually make the silly facial features stand out even more.
Make Your Own Fuzzy Monster Rocks
These fuzzy monsters prove that Halloween rock painting doesn’t have to be complicated or scary.
Start with a bright color, add a fuzzy border, and then have fun creating the silliest monster face you can imagine. One monster might have three eyes and sharp teeth while the next has one giant eye and a goofy smile.
That’s part of the fun. No two monster rocks have to look alike.
Make a couple for your Halloween decorations, paint them during family craft night, or create an entire colorful group of silly monsters.
And if you’re ready for another Halloween project, head over to my 31+ Halloween Rock Painting Ideas for plenty more rocks to paint this spooky season.
